Research: Analysis of Trusted Platform Module chips
The goal of the research is to get a better understanding of the Trusted Platform Modules ecosystem. Such information is vital for the designers and developers using this technology, allowing them to answer questions like What fraction of devices has a TPM chip? Which cryptographic algorithms are widely supported? What is the overhead of computing a digital signature?
The research consists of two primary steps:
- Collection of raw data about TPM chips deployed in real-world devices like notebooks, desktops, and servers (the part we are asking you for kind help with).
- Analysis of the data collected to provide insight into the TPM ecosystem (done by us, resulting in a summary of the most important findings, scientific paper, and research dataset available for replicability and further research).
How to collect data via Live Bootable Image
The data collection consists of 3 principal steps:
- Preparation of bootable USB drive (20 minutes to download image and 10 minutes to setup)
- TPM data collection (typically 1-3 hours, 5 hours at most) using a live image
- Send collected data (anonymous upload, email)
- (step 2., and 3., can be repeated for multiple computers; no need to create a USB drive again)
Duration: The preparation of a bootable device will take approximately 20 minutes to download the image and 10 minutes to set up.
- Prepare an empty USB drive with at least 4GB size (IMPORTANT: all content will be erased)
- Download live USB image: algtest-usb-disk.img and save to disk
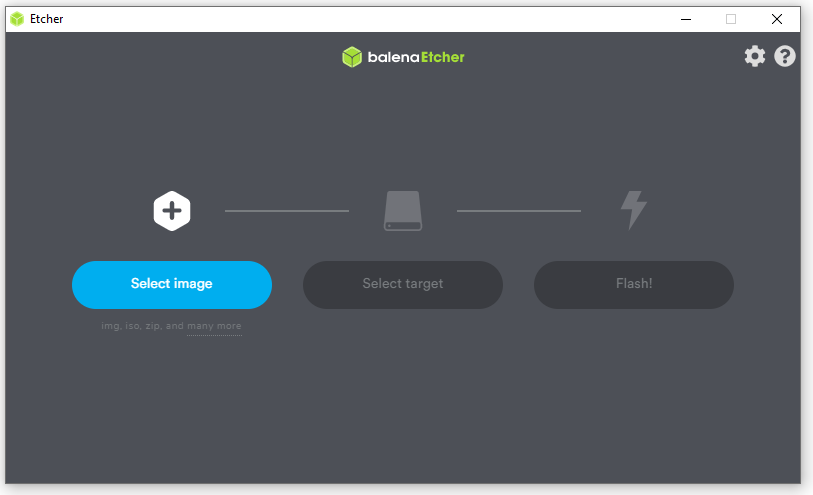
- Download and install Balena Etcher (Windows, Linux, Mac) to create a bootable USB drive. (Alternatively, you may use Rufus instead (Windows only)).
- Run Balena Etcher, click Select image and browse for previously downloaded algtest-usb-disk.img on your disk
- Insert empty USB drive, click Select target, and pick the USB disk
- (double-check that the displayed drive is your intended USB drive – check the label and check size)
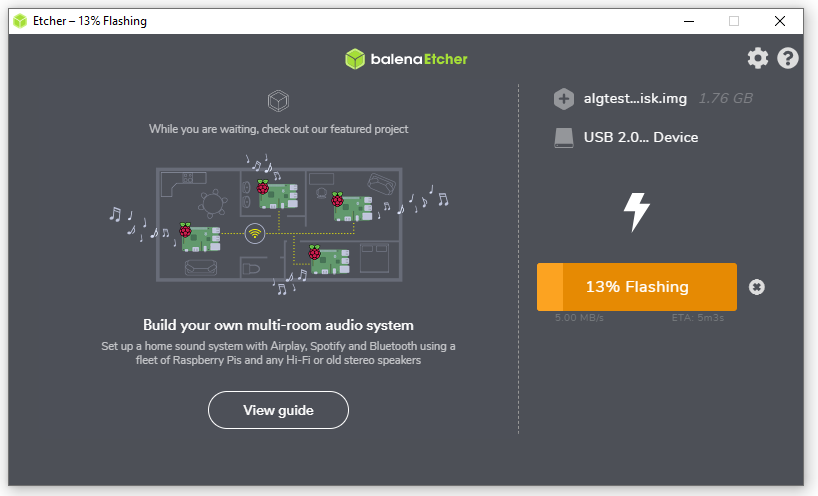
- Click Flash! and wait approximately 5 minutes until flashing is completed.
Duration: Running the Fedora-based system from the bootable device and data collection will take approximately 1-3 hours (8 at most).
- Place your computer in a steady location (on the desk) and plug-in the power cable.
- Insert the installed USB drive from step 1 into the computer and restart your machine.
- If prompted, select boot from USB device instead of standard disk. Select Start Fedora-algtest-Live 37 boot option.

- Wait until the Fedora-based TPM testing system is booted. Read the summary of the data we are collecting.

- Press the Start basic test button
- Check that test has started and is running (Log window contains 'XX:YY:ZZ Starting TPM test…').

- Wait for 1-3 (5 at most) hours until the test is finished (100% Test progress).
- IMPORTANT: If the test will not finish even after 5 hours and no visible progress is seen, please press the Stop button and continue to upload the partial results.
- Press the Upload results button (if network is configured)

- Press the Shutdown PC button; wait until your machine is stopped. Unplug the USB drive.
- Restart your computer to your standard environment
- Make sure the USB drive is unplugged.
- Start into your standard environment (e.g., Windows, Linux).
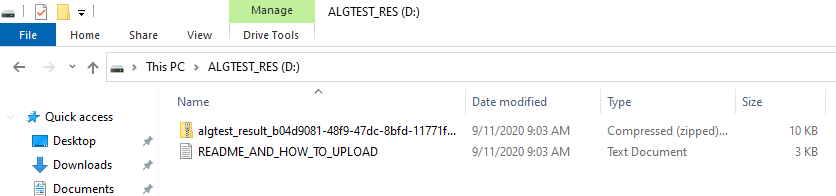
- Plug the USB drive, new drive with label
ALGTEST_RESis mounted (e.g., 'E:\'). - Locate file(s) with a file name in the form of
algtest_result_xxxxxx-xxxx-xxxx-xxxx-xxxxxxxx.zip. - Visit the page
https://is.muni.cz/dok/depository_in?lang=en;vybos_vzorek=4085and follow instructions on how to upload the file (no authentication required, just drop the files). Alternatively, send an email to Petr Svenda tpm.crocs@gmail.com with the filealgtest_result_xxx.zipattached.

Issue: Solutions below do not solve the problem
Solution: If you have any issue that the solutions below will not help with, please notify us at tpm.crocs@gmail.com.
Issue: The bootable image cannot be downloaded
Solution: Download from the secondary backup location. Please notify us at tpm.crocs@gmail.com.
Issue: The live Fedora system will not start to boot
Solution: Go to BIOS (press F1, F8, F12, Enter, or a special button depending on your computer), select the alternative boot device (USB you flashed), and continue
Issue: The booting from live image will stop with unspecific Security Policy Violation error (older computers)
Solution: Go to BIOS (press F1, F8, F12, Enter, or a special button depending on your computer), disable temporarily UEFI or Trusted boot (option name varies based on your BIOS) and restart.
Issue: The live Fedora system will stop with an error during boot
Solution: Try to change the USB slot used to insert the bootable USB disk, and try to put the device into a stable position to prevent interruption of communication to the USB disk.
Issue: The TPM data collection will start but finish very quickly (less than 10 seconds) with the error 'Cannot collect TPM 2.0 info. Your TPM may probably be disabled in BIOS, or you do not have a TPM 2.0.'
Solution 1: Restart your computer, enter BIOS (press F1, F8, F12, Enter or special button right), and enable option named 'TPM chip,' 'Security chip,' or similar. Then try to boot from USB again.
Solution 2: Try to update your BIOS if possible (older BIOSes are known to have incompatibility with some TPM chips under Linux). Then restart and boot from USB again.
Please submit the results even if the error persists.
Issue: I want to see the source code and build a live image myself
Solution: You are more than welcome, please visit https://github.com/danzatt/tpm2_algtest_live for live image builder repository and https://github.com/crocs-muni/tpm2-algtest (collection tool itself).
Research details
Primary contact: doc. Petr Svenda <svenda@fi.muni.cz>
Research institute: CRoCS laboratory, Masaryk University and Red Hat Czech
Collected data:
Data we collect:
- Device vendor, type (e.g.,
Lenovo ThinkBook 15) and BIOS version. - TPM vendor, firmware version (e.g.,
Intel 401.1.0.0) and TPM version-related information. - TPM PCR registers (see
Capability_pcrread.txt). - TPM metadata (
TPM2_PT_xxxproperties likeTPM2_PT_REVISION,TPM2_PT_MANUFACTURERorTPM2_PT_PCR_COUNT– see fileCapability_properties-fixed.txtandCapability_properties-variable.txtfor full list). - Algorithms and commands supported by TPM (see
Capability_algorithms.txtandCapability_commands.txtfor full list). - Performance measurements for various cryptographic algorithms (see
Perf_xxx.csvfiles). - Freshly generated transient keys and signatures for ECC and RSA (see
Keygen_xxx.csvandCryptoops_xxx.csv). - Generated random data (see
Rng.bin). - Anonymized endorsement key (EK) certificates (see
Capability_ek-xxx.txt'). - Note: All mentioned files are stored inside the
algtest_result_xxx.zipfile.
Data we do NOT collect:
- Personal information about the user of the analyzed computer.
- Full endorsement keys (we collect only the first and the last two bytes).
- Attestation key(s).
- User-specific content of the non-volatile TPM memory (NVRAM).
Data Retention:
- We plan to release the data collected as open research dataset to enable wider research cooperation.
- The CRoCS research team will first analyze the data collected for the purpose of analyzing the current TPM chip ecosystem. We plan to release the data collected together with the research findings.